A FOIA agency may request documents for the following reasons:
If it feels that the requested records can be searched for and collected from facilities or other establishments that are separate from the office processing the request.
If there is a need to search for, collect and examine a voluminous amount of separate and distinct records which are demanded in a single request.
If there is a need for consultation, and another agency has a substantial interest in the determination of the Request
Steps to Request the Documents from a Remote Client
If the FOIA office doesn't have the required documents to respond to a Request, it can request the documents from other program offices. The process of requesting documents from a Remote Client is described below in three sections.
Actions in FOIA Office
Open the Request for which you need to request documents.
Click Request for Documents. The Request for Documents screen displays as shown below.
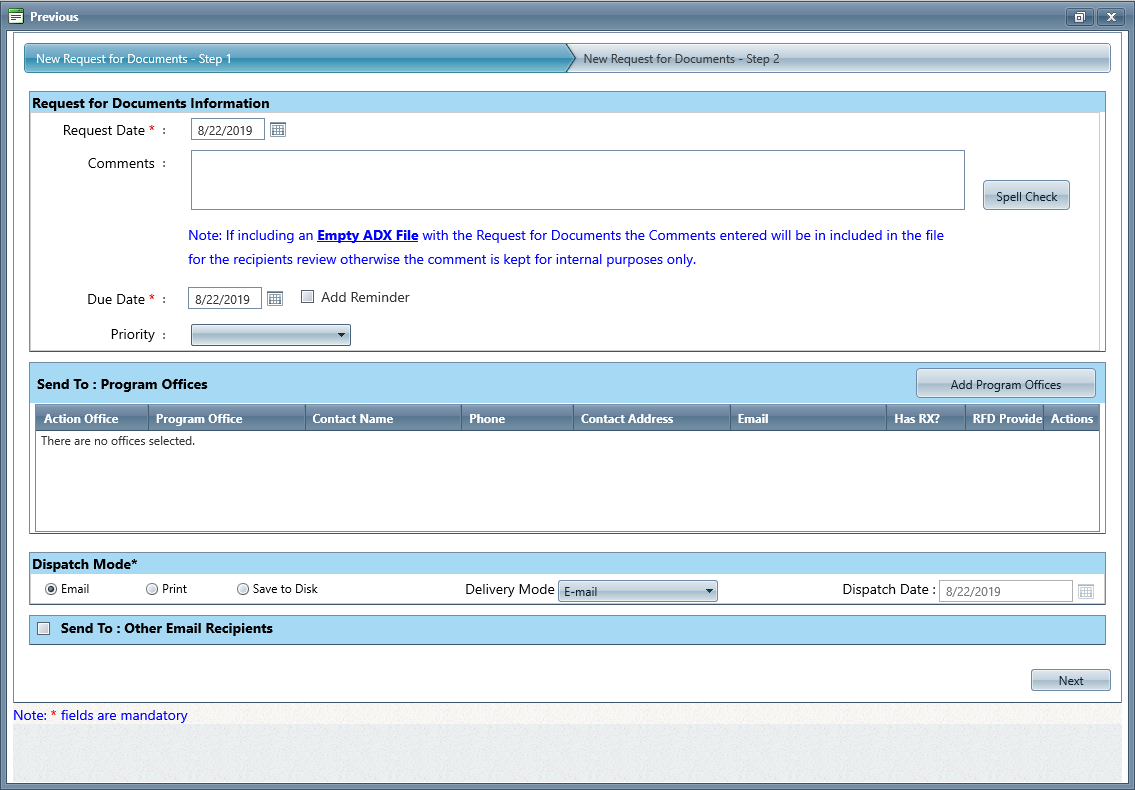
Click New. Step 1 of theNew Request for Documents screen displays as shown below.
Enter information in the following fields as necessary:
Field
Description
Request for Documents Information
Request Date
The Request Date, selected using the Calendar icon
Comments
Any relevant Comments.
Due Date
The Due Date for the requested documents, selected using the Calendar icon
Add Reminder
Set a reminder for the due date. If selected, you will be given options to set the Number of days prior to the due date when the reminder will be given, and a field to add a Reminder Note to be included with the reminder
Priority
The priority level of the request. Options are High, Low, or Normal.
Send To: Program Offices
Send To: Program Offices
Add Program Offices
The Program Office from which you need to request documents. If no Program Offices are listed, Add Program Offices can be used to select Program Office(s) to add
(!!) Note: When submitting System to System requests, the selected Program Office must be a designated Records Provider
Dispatch Mode
Dispatch Mode
How the Request will be sent. Options include Email, Print, and Save to Disk. Email will be selected by default.
Delivery Mode
How the documents will be delivered. Options include CD and Diskette, Commercia Carrier, E-mail, Fax, Hand Delivery, Mail, Other, and PAL.
Dispatch Date
The date on which the request for documents will be sent. You can also select the date by clicking on the Calendar icon. This option will be disabled if Email is selected as the Dispatch Mode.
Send To: Other Email Recipients
Send To: Other Email Recipients
Send the request for documents to email recipients other than the Program Office(s). There are options to Add Email Manually, add by using the Global Address List, or Remove Selected recipients from the list.
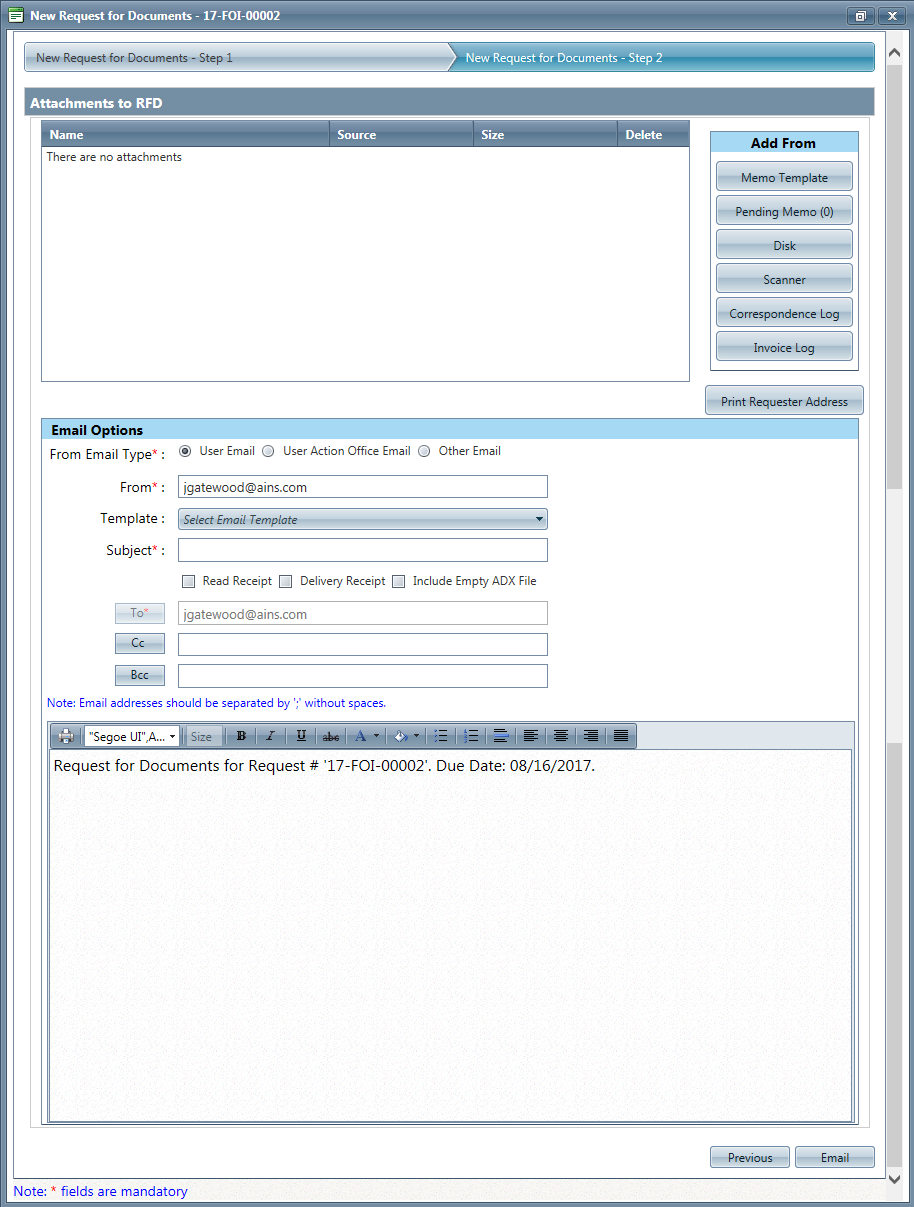
Click Next. Step 2 of the New Request for Documents screen will display. The fields here depend on the Dispatch Type selected on the previous screen. The Email Options are shown below:
Select the From Email Type: You can select your User Email, User Action Office Email (email associated with your action office), or user Other Email to manually enter a sender address.
To add attachments to the request, click one or more of the following options listed under Add From: Memo Template, Pending Memo, Disk, Correspondence Log, or Scanner, then select the attachments you want to add. You can also select Print Requester Address to print the address of the requester.
Fill in the fields on this page as needed. These fields are described in the tables below for each of the available dispatch modes.
Field
Description
Email
From
The email address that appears in the From field in the recipient's request email message.
Template
The template for the outgoing request message.
Subject
The subject line for the outgoing request message.
Read Receipt
Receive a read receipt when the end user opens the request
Delivery Receipt
Receive a delivery receipt when the end user receives the request
Include Empty ADX File
Include an empty ADX file will be attached to the request so that the Remote Client can use this file to add documents and send it back. The attached ADX file contains the request for documents and Request information such as Request ID, type, Requester name, type, target date, etc.
Cc
Add carbon copy recipients to the outgoing request messages.
Bcc
Add blind copy recipients to the outgoing request messages.
Message Body
Text for the outgoing document request message.
Print
Subject
Subject for the printing job
Save to Disk
Subject
Subject for the Save to Disk job
Include Empty ADX File
Select to include an empty ADX file when saving to disk
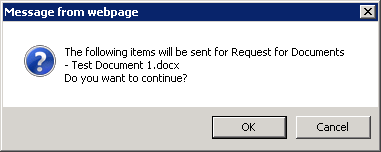
After all fields are filled in, click Email, Print, or Save to Disk as applicable. Only one of these actions will be available based on the Dispatch Mode selected in step 3. A verification message displays as shown below.
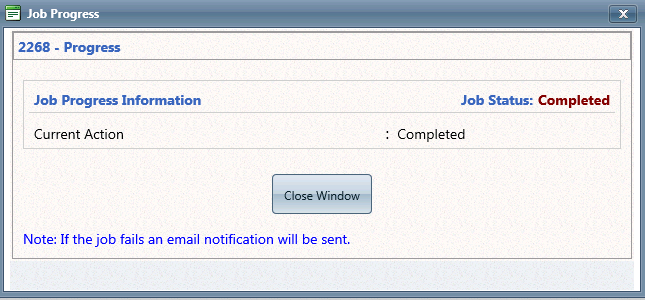
Click OK. The Job Progress window displays as shown below.
Click Close Window to return to the Request for Documents screen, where the new request for documents displays.
(!!) Note: If the option to include an empty ADX file is selected in Step 2, an empty ADX file will be attached to the request so that the Remote Client can use this file to add documents and send it back. The attached ADX file contains the request for documents and Request information such as Request ID, type, Requester name, type, target date, etc.
Actions in Remote Client if Empty ADX File is Sent
Please refer to the RedactXpress manual for specific instructions for working with ADX files in RedactXpress.
Record Provider Actions
Program Offices designated as Records Providers must take specific actions to fulfill RFDs. When an RFD is received by a Records Provider, the email is accompanied by a link, as highlighted in the following image:
This link directs the user to the designated Records Provider Drop Location, where responsive documents are to be placed for transfer to the connected system.
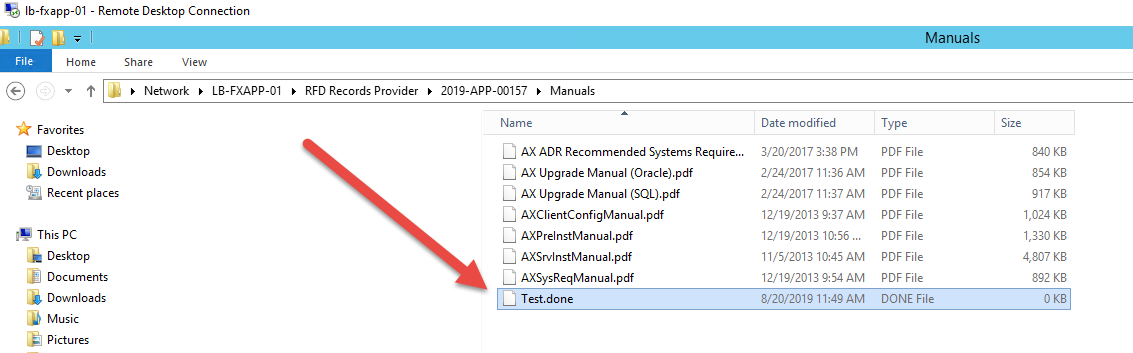
When responding to an RFD, the Records Provider will navigate to the folder provided in the link and place all responsive documents in the folder.
As part of the response process, the user placing the files must also place a "done" file with the documents. This is any file with the extension ".done" and is required to process the files. The system will not pick up any documents from the Drop Location unless it reads a ".done" file, as shown in the example below:
(!!) Note: A .done file must be included in the Drop Location or the system job will not pick up the files
After placing the files in the Drop Location along with the .done file, a system job will pick up the files and move them to the connected system. After the job completes, the documents are available for further review and processing using the View Docs button from the Request for Documents tab.
Importing from Request for Documents
Select the request for documents for which you want to import documents.
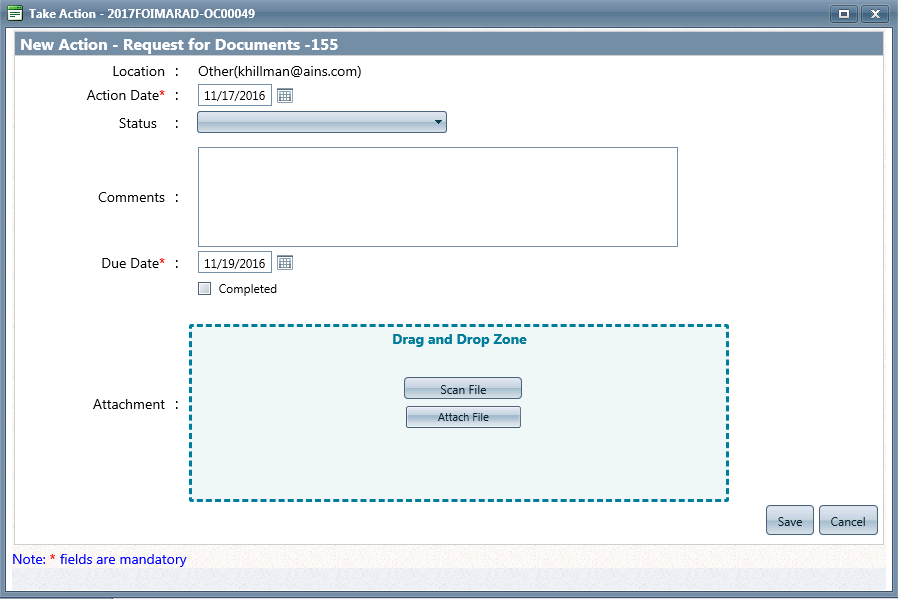
Click Take Action. The Take Action window will be displayed as shown below.
(!!) Note: If the Barcodes option is enabled this will be available under the Drag and Drop Zone
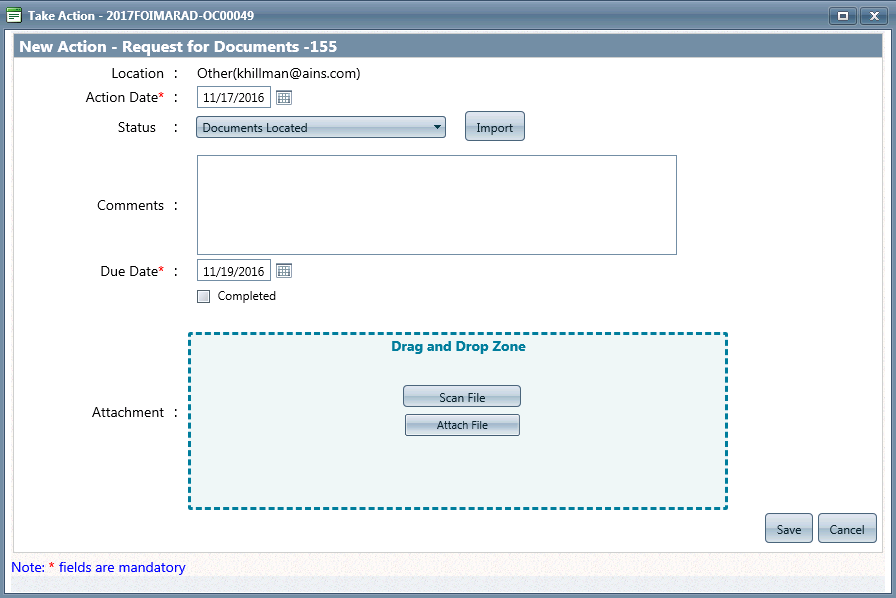
From the Status drop-down menu, select Documents Located. The screen will display an option to Import as shown below:
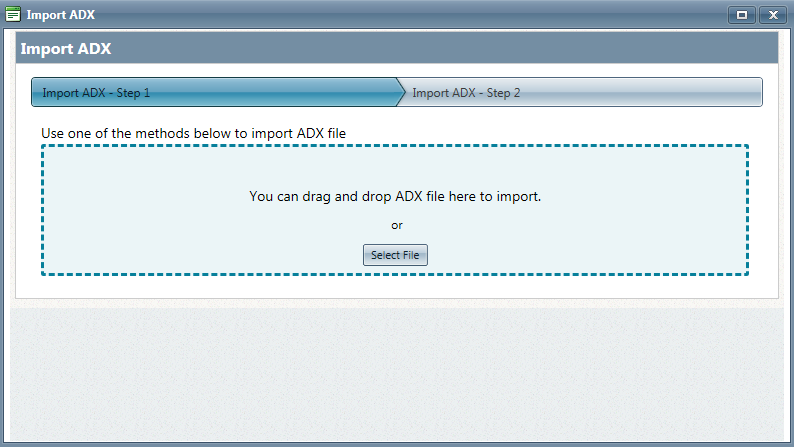
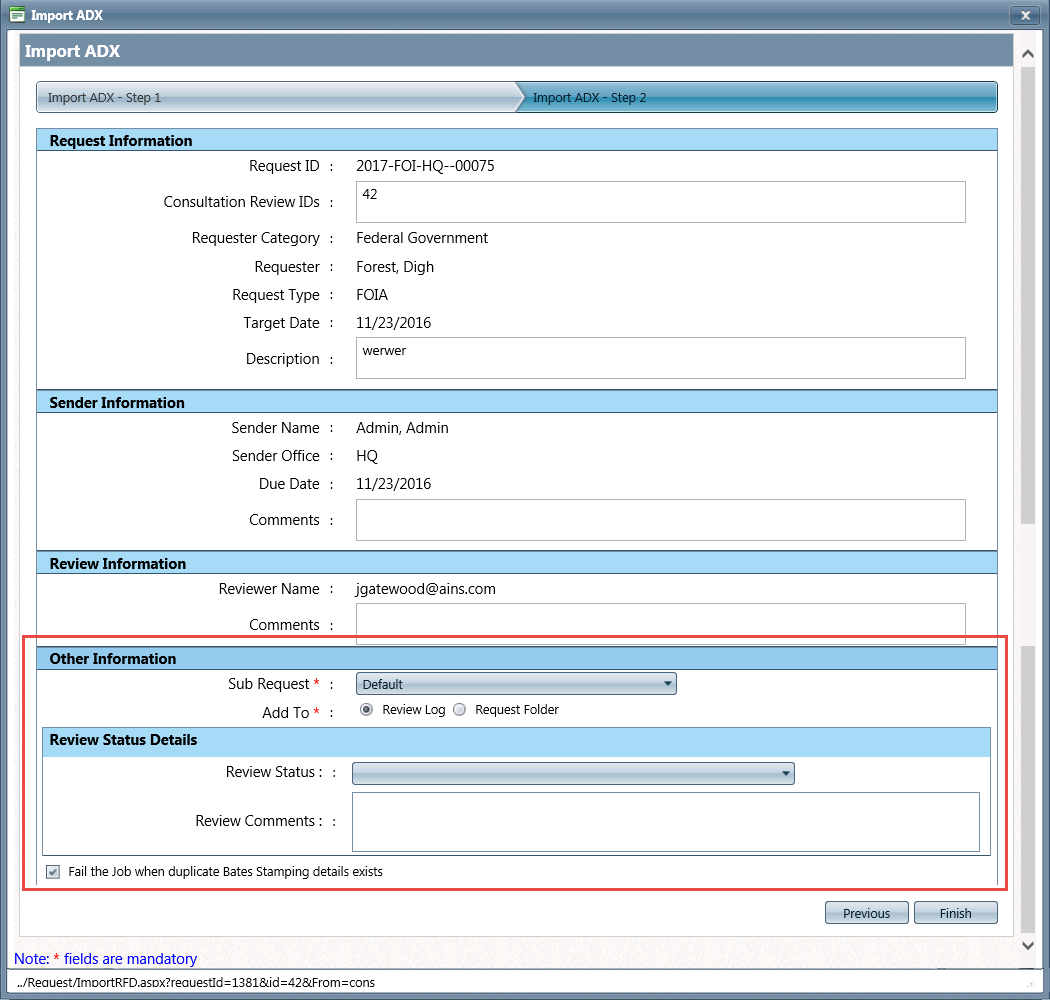
Click Import. The Import ADX window displays as shown below.
Drag and drop the ADX file you want to import into the space provided, or click Select File, select the ADX file you want to import, and then click Open.
Click Next. Step 2 of the Import ADX process displays as shown below.
Click Finish. A verification message displays as shown below.
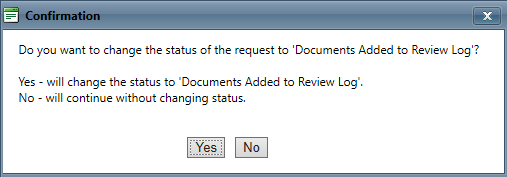
Click OK to change the status of the Request to "Documents Added to Review Log" or click Cancel to continue without changing the status.
A Job Progress window will indicate when the job is completed, as shown below. Click Close Window.
The Take Action window displaysas shown below. Click Save.
(!!) Note: After clicking Save, the Status of the request for documents will change to "Documents Located", as shown below.
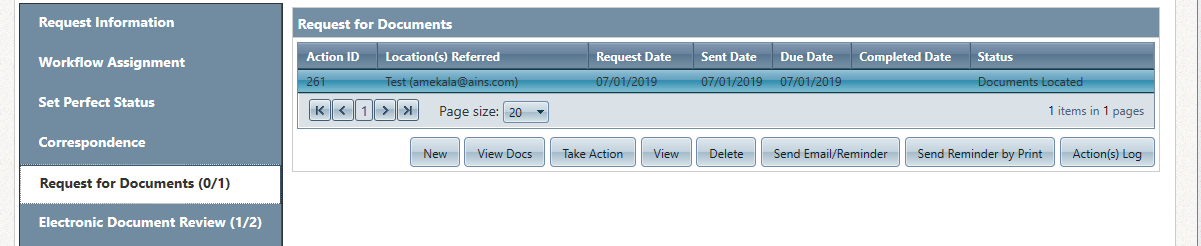
Viewing Requests for Documents
Open the Request for which you want to view Requests for Documents.
Click Request for Documents. The Requests for Documentsscreen displays as shown below.
All requests for documents that have been sent displays according to:
Field
Description
Action ID
An identification number assigned to the request for documents action.
Location(s) Referred
Location(s) to which the request for documents has been referred.
Request Date
Date on which the action was performed.
Sent Date
Date on which the request for documents was sent.
Due Date
Date on which the request for documents is due to be filled.
Completed Date
The date on which the request for documents was completed.
Status
Displays the status of the request for documents based on actions performed.
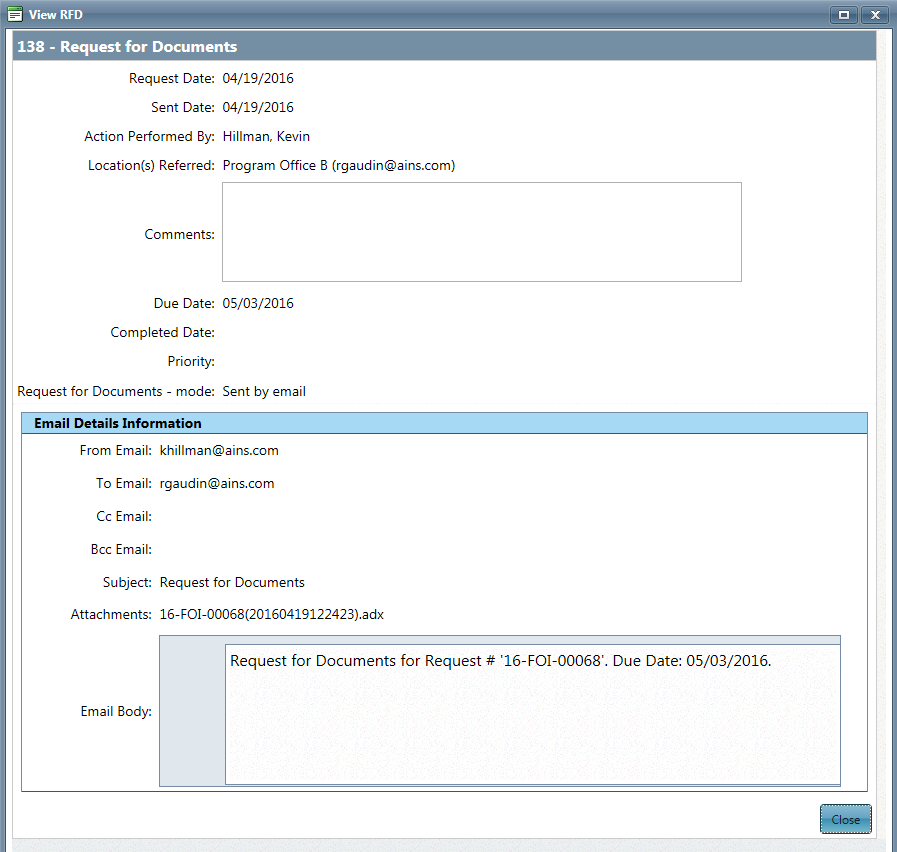
To view request for document details, select a Request, then clickView. The View RFD screen displays as shown below.
On this screen, you can view the following Request information:
Field
Description
Request Date
The date on which the request for documents was created.
Sent Date
The date on which the request for documents has been sent.
Action Performed By
The user who sent the request for documents.
Location(s) Referred
The location(s) selected for sending the request for documents.
Comments
Any comments entered by the user that sent the request.
Due Date
The day on which a response to the request is expected.
Completed Date
The date the Request for Documents was completed
Priority
The request priority.
Request for documents - mode
The mode by which the request for documents was sent.
Email Details Information (Visible If Request is sent by Email)
From Email
The email address of the message sender.
To Email
The email address of the message recipient.
Cc Email
The email address(es) of recipients copied on the message.
Bcc Email
The email address(es) of recipients blind-copied on the message.
Subject
The subject line of the Email.
Attachments
The name(s) of file(s) attached to the Email.
Email Body
The message body of the Email.
(!!) Notes:
Users can view the RFD entry without having the request assigned to them. If they have the "Special Access" Permission, they can take action on the RFD entries.
When sending an RFD prior to Perfecting the request, the Request Status will remain "RFD Sent”.
The View, Take Actions, and Action(s) Log buttons are not visible if there are no actions available for the RFD. The Edit button will be visible only if you have pending requests for documents.
The full email body and memo template delivered as part of a request for documents displays when viewing the RFD history.
The View Docs button is only available on System-to-System Requests. See the Viewing Documents section below for more information.
Viewing RFD Documents
Requests with System to System processing enabled, and with Requests for Documents submitted to a designated Records Provider, the View Docs selection is enabled on the Request for Documents tab, as shown below:
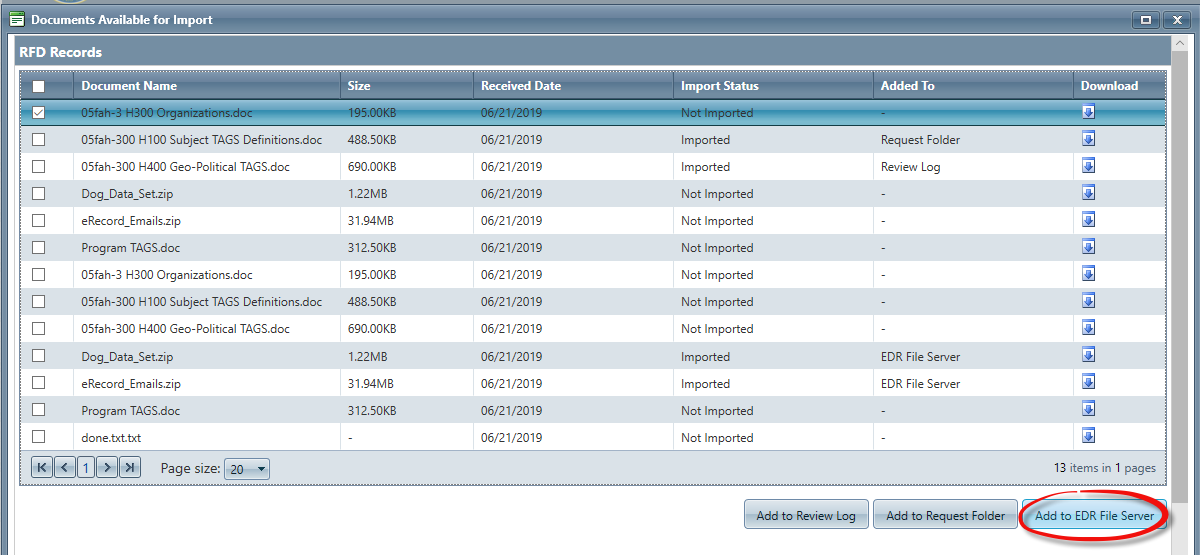
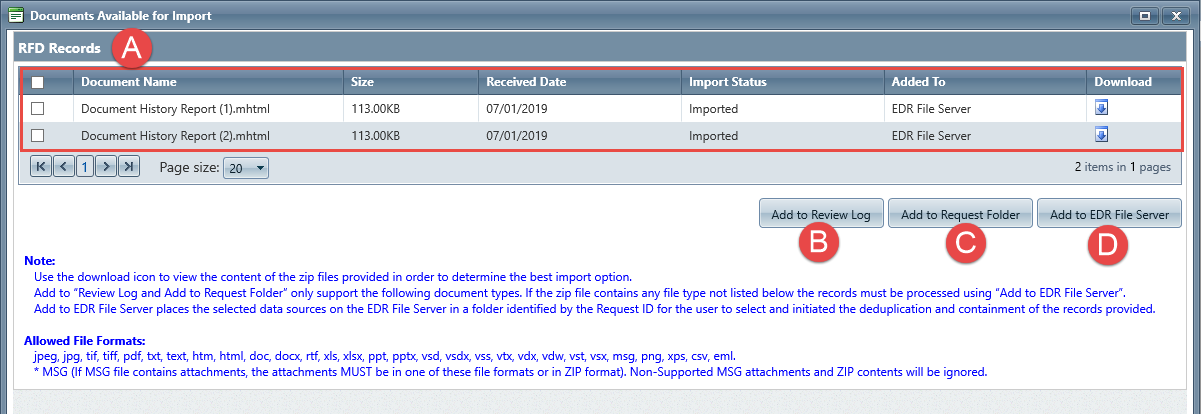
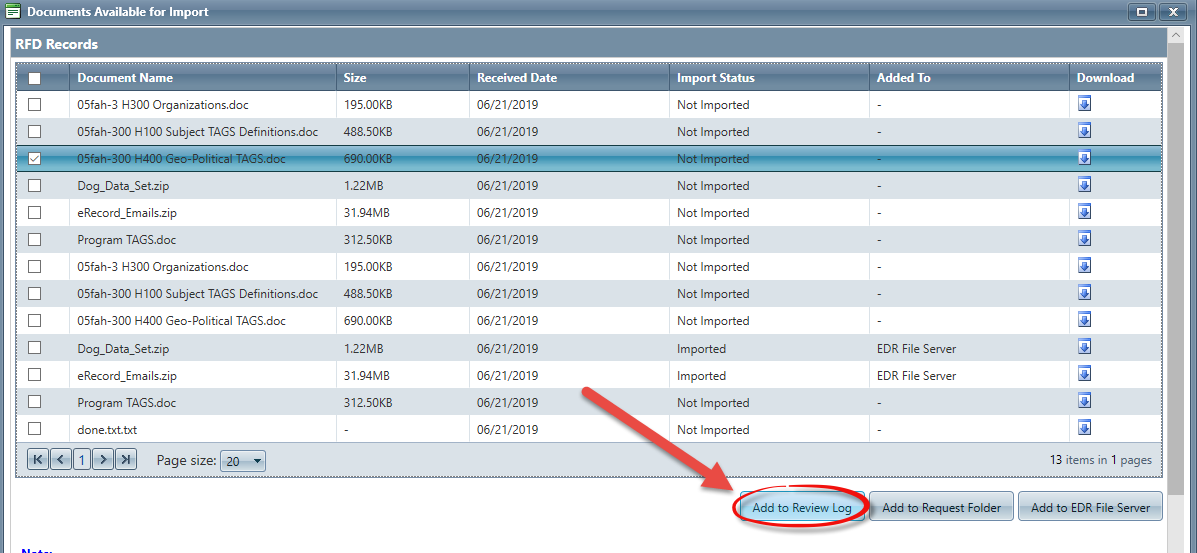
After documents are received from the Records Provider, these can be viewed by clicking View Docs from the Request for Documents tab. After selecting View Docs, the Documents Available for Import screen appears as shown below:
All documents received from the Records Provider for this request are listed in the (A) RFD Records, which lists document details (Document Name, file Size, Received Date, Import Status, Added To, and a link to Download the document). There are also buttons to take any selected RFD Records and (B) Add to Review Log, (C) Add to Request Folder, or (D) Add to EDR File Server.
Add RFD Document to Review Log
After documents are received from a Records Provider in response to a Request for Documents, these can be added to a Request's Review Log. Follow the steps below to move RFD Documents to the Review Log of a request:
Open a Request for which documents were received in response to an RFD, and navigate to the Request for Documents tab, as shown below:
Select an RFD from the list, then click View Docs.
The Documents Available for Import screen appears. Select the documents to be added then click Add to Review Log:
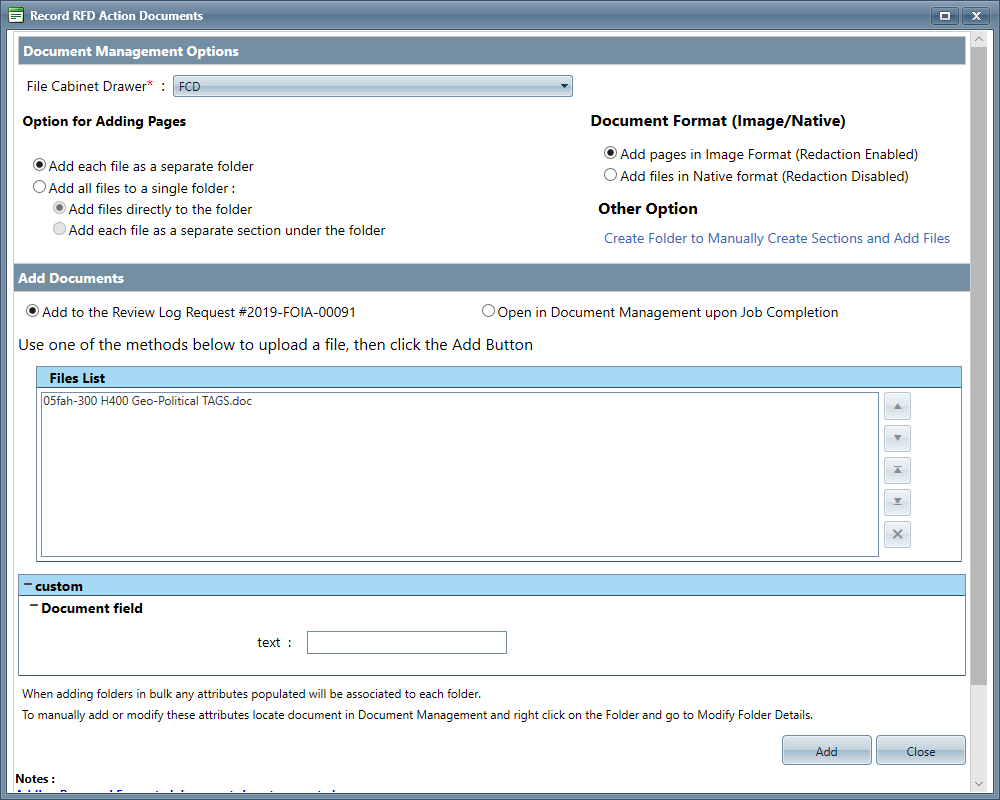
After clicking Add to Review Log, the Record RFD Action Documents screen appears as shown below:
Adjust the selections as needed. The fields on this screen are described in the following table:
Field
Description
Document Management Options
File Cabinet Drawer
File Cabinet Drawer serving as the source
Option for Adding Pages
Select from the following options:
Add each file as a separate folder: Each file added will fall under a separate folder within the selected Document Management File Cabinet Drawer
Add all files to a single folder: All files are added to the same folder. If selecting this option, also select one of the following sub-options
Add files directly to the folder: Add the files to the folder without sections
Add each file as a separate section under the folder: Add the files to the folder, each under a separate section
Document Format (Image/Native)
Select the format for documents to be imported:
Add pages in Image Format (Redaction Enabled): Converts documents to image files, with the redaction features enabled
Add files in Native format (Redaction Disabled): Add files in the native format, which does not allow for utilizing redaction features.
Other Option
Create Folder to Manually Create Sections and Add Files: Use this option to manually configure how the files are added to the folder
Add Documents
Add to the Review Log Request
Use this selection to add the selected documents to the review log of the request
Open in Document Management upon Job Completion
Use this selection to open the selected documents in the Document Management module, where they can be moved
Files List
List of files to be included in the Add action.
After configuring the settings, click Add to add the documents to the review log with the selected attributes.
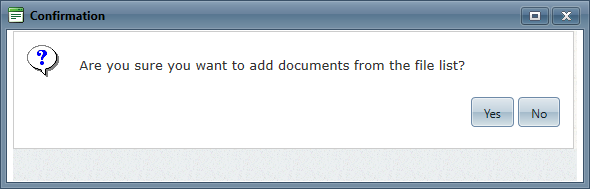
After clicking Add, a Confirmation screen appears as shown below. Click Yes to proceed.
"
A second Confirmation appears, asking if the request status should be updated. Click Yes to update or No to retain the current status.
A Job Status window appears. After the job processes, the Request for Documents tab refreshes. Looking again at the View Docs screen, the document now shows it was Added to the Review Log:
Add RFD Document to Request Folder
After documents are received from a Records Provider in response to a Request for Documents, these can be added to the EDR File Server. Follow the steps below to move RFD Documents to the EDR File Server:
Open a Request for which documents were received in response to an RFD, and navigate to the Request for Documents tab, as shown below:
Select an RFD from the list, then click View Docs.
The Documents Available for Import screen appears. Select the documents to be added then click Add to EDR File Server:
After clicking Add to EDR File Server, the Record RFD Action Documents screen appears as shown below:
Adjust the selections as needed. The fields on this screen are described in the following table:
Field
Description
Document Management Options
File Cabinet Drawer
File Cabinet Drawer serving as the source
Option for Adding Pages
Select from the following options:
Add each file as a separate folder: Each file added will fall under a separate folder within the selected Document Management File Cabinet Drawer
Add all files to a single folder: All files are added to the same folder. If selecting this option, also select one of the following sub-options
Add files directly to the folder: Add the files to the folder without sections
Add each file as a separate section under the folder: Add the files to the folder, each under a separate section
Document Format (Image/Native)
Select the format for documents to be imported:
Add pages in Image Format (Redaction Enabled): Converts documents to image files, with the redaction features enabled
Add files in Native format (Redaction Disabled): Add files in the native format, which does not allow for utilizing redaction features.
Other Option
Create Folder to Manually Create Sections and Add Files: Use this option to manually configure how the files are added to the folder
Add Documents
Add to the Request folder of Request
Use this selection to add the selected documents to the request folder
Open in Document Management upon Job Completion
Use this selection to open the selected documents in the Document Management module, where they can be moved
Files List
List of files to be included in the Add action.
After configuring the settings, click Add to add the documents to the review log with the selected attributes.
After clicking Add, a Confirmation screen appears as shown below. Click Yes to proceed.
A Job Status window appears. After the job processes, the Request for Documents tab refreshes. Looking again at the View Docs screen, the document now shows it was Added to the Request Folder:
Add RFD Document to EDR File Server
After documents are received from a Records Provider in response to a Request for Documents, these can be added to the Request Folder. Follow the steps below to move RFD Documents to the Request Folder:
Open a Request for which documents were received in response to an RFD, and navigate to the Request for Documents tab, as shown below:
Select an RFD from the list, then click View Docs.
The Documents Available for Import screen appears. Select the documents to be added then click Add to EDR File Server
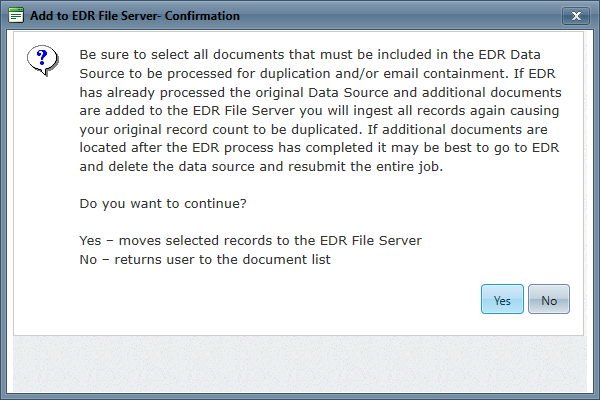
A notification appears as shown below. Carefully read the note, then click Yes to continue.
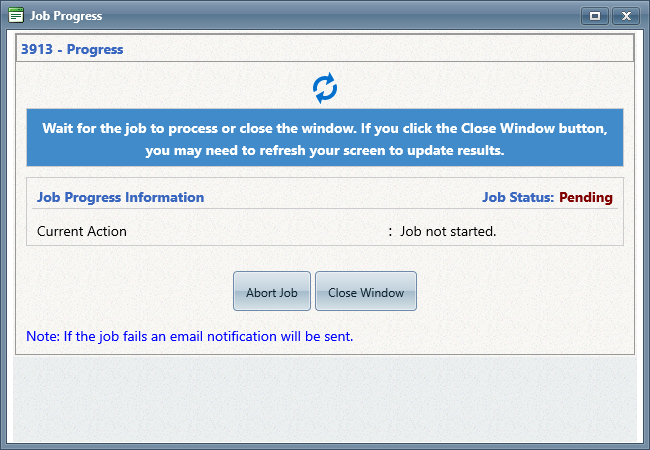
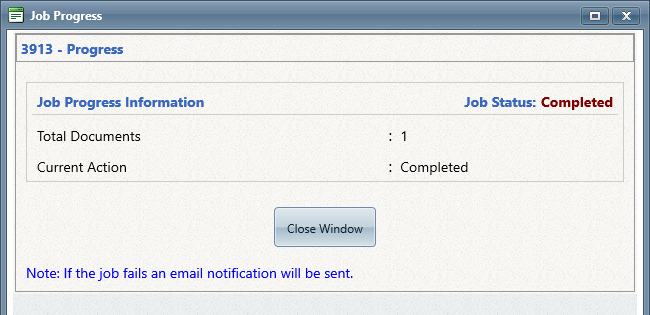
After clicking Yes, a Job Progress window appears as the job is processed.
After the job completes, the status changes to Completed. Click Close Window to complete the action.
The View Docs screen updates with the status of the moved documents now reading Added to the EDR File Server:
A few more steps are required to get the documents successfully loaded into EDR. Navigate to the Electronic Document Review tab, then under Data Soruce select From EDR File Server.
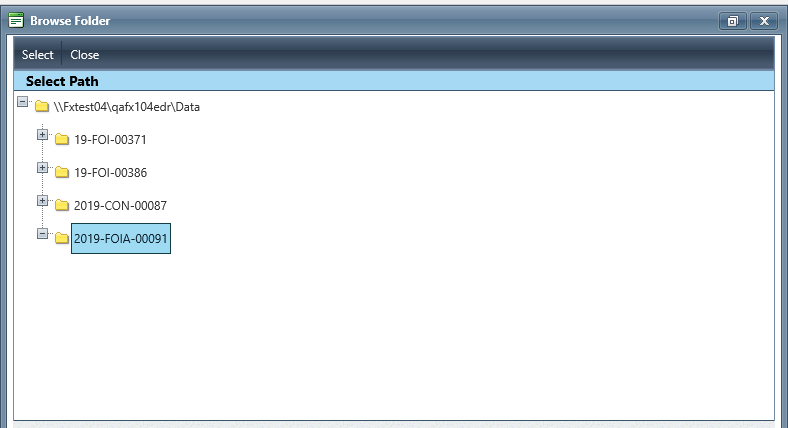
The Browse Folder window appears with the current case folder preselected. Click Select to continue:
The Electronic Document Review tab reloads. Adjust the settings as necessary prior to import (see Adding Documents to EDR for details) then click Next.
At the Step 2 screen, click Finish to continue import.
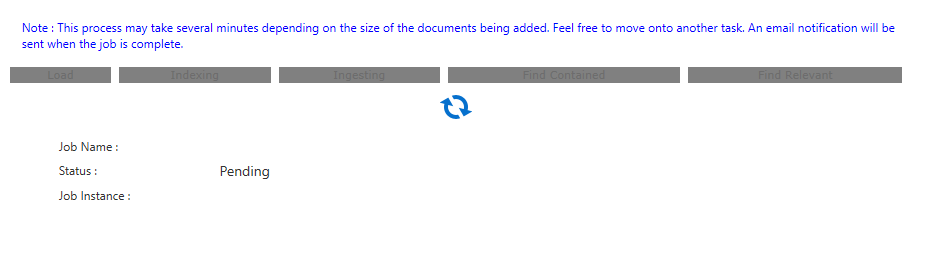
A job begins to load the documents into EDR with the progress displayed as shown below.
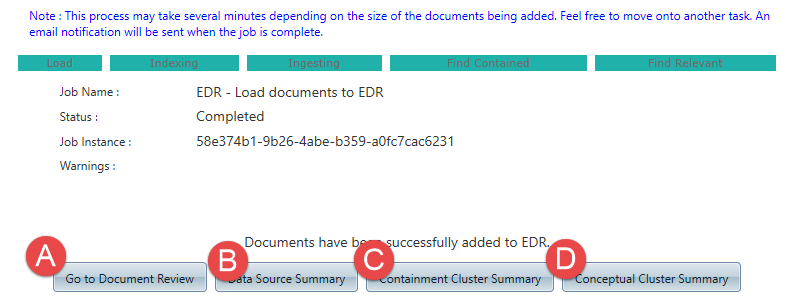
When the job completes, additional options become available depending on the ingestion selections, including (A) Go to Document Review, (B) Data Source Summary, (C) Containment Clister Summary and (D) Conceptual Cluster Summary.


 "
"