Final Actions

Click below to move to a specific heading in this topic HideClick below to move to a specific heading in this topic Show
  1. Final Actions
    1. Steps to Take Final Actions on a Request
    2. Steps to Edit Final Actions

After adding documents to the Request folder, the next step in the process is completing -or performing final actions on- the Request before the documents are delivered to the Requester. Only after a Request has been completed can the relevant documents be delivered to the Requester. When taking final actions, the action officer sets the disposition of the overall Request and reviews the list of exemptions used to withhold information from the Requester.

FOIAXpress will automatically list all exemptions used to withhold information if the redacted documents are moved into the Request folder. However, if documents are not moved into the Request folder, the action officer must select the disposition and manually select the exemption or other reasons used. Final disposition of the Request can be calculated only when all the sub-Requests have their final disposition entered.


You can perform the following final actions on a Request:

  1. Granted in Full: The entire record is granted to the Requester without redacting or exempting any information.

    (!!) Note: When the redaction code is set to "Blank" or "Non Responsive," the Document Review Flag gets updated to "Granted in Full," consistent with the Final Disposition.

  2. Denied in Full: The entire record is denied, as information contained therein is of a sensitive nature.

  3. Denied in Part: A portion of the record containing information detrimental to public interest is redacted, while the remaining document is delivered to the Requester.

  4. Other Reasons: A Request can be denied in whole or in part for reasons other than those specified by the FOIA.

    (!!) Note: Redaction codes differ from agency to agency. Some FOIA agencies formulate their own codes according to their requirements.

Steps to Take Final Actions on a Request

  1. Open the Request you want to take Final Actions on.

  2. Click Final Actions. The Final Actions screen displays as shown below.


    (!!) Notes:

    On the Final Actions screen, the Request Description or Sub Requests will be listed. Depending on the redactions applied to the documents for the Request or Sub Request, the Action column will be populated with the appropriate Actions. If no documents were added, the status "TBD" (to be determined) displays.

    Additionally, if a Fee Waiver was requested but a determination is not yet made, you are prompted to make this determination prior to taking final actions. 

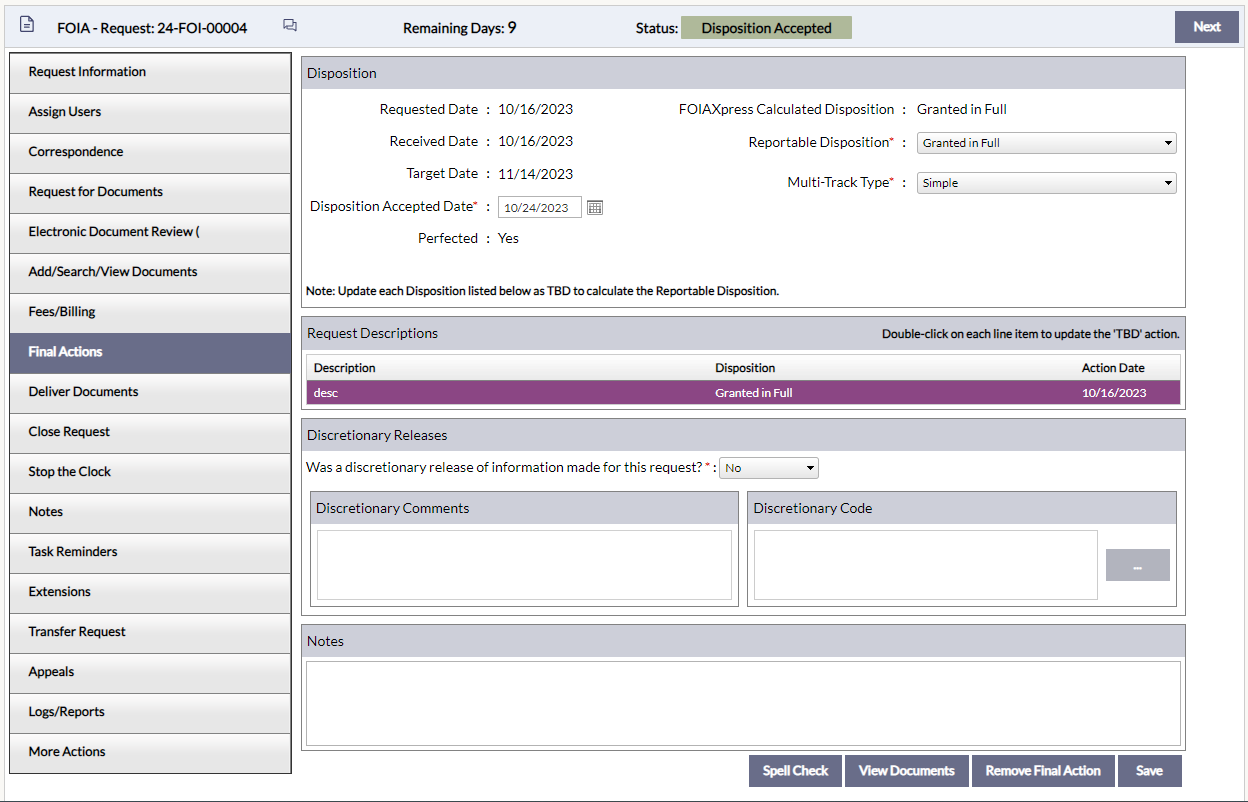
  3. Fill out the fields on this screen as needed. These fields are described in the table below. To select an Action or view redaction code details, double click the line item under Request Description.

    Field

    Description

    Disposition


    Requested Date

    The date on which the Request was sent to the FOIA Office.

    Received Date

    The date on which the FOIA Office received the Request.

    Target Date

    The date by which the Request is due for completion.

    Disposition Accepted Date

    The date on which the Final Actions were performed on the Request. The Disposition Accepted Date should not be before the Perfected Date.

    Perfected

    Indicates whether the Request has been perfected.

    FOIAXpress Calculated Disposition

    The Disposition calculated automatically by the application.

    Reportable Disposition

    Reportable Disposition options include Granted in Full, Denied in Full, Denied in Part or Other Reasons.

    Denial Authority

    Denial Authorities are listed on a drop-down menu, and are created under Administration > Lookups > Denial Authorities.

    Multi-Track Type

    Three Multi-Track Types are available: Simple, Complex, or Expedite.

    Expedite Information


    Start Date

    The date the Request was initially expedited (if applicable).

    End Date

    The date the Expedite Request process ended (if applicable).

    Determination

    Select a Determination from the drop-down menu (If applicable)

    Request Descriptions


    Description

    Description of the Request.

    Disposition

    The Disposition of the Request.

    Exemption/Exclusion Codes Applied

    Exemption/Exclusion Codes applied to the Request

    Discretionary Releases


    Was a discretionary release of information made for this request?

    Click the drop-down menu and select either Yes or No.

    Discretionary Comments

    If Yes is selected above, this field becomes enabled. Enter any comments regarding the discretionary release of information.

    Discretionary Code

    Select the relevant Exemption/Exclusion Codes

    Notes


    Notes

    Enter any notes regarding the Final Actions.

  4. Click Save to save the Final Actions.

    (!!) Note: If there are documents associated with a Sub Request, the Sub Request can't be deleted. It can be deleted using the "Remove from Request Folder" option in Document Management. A Request can be completed only when Final Actions are applied on all Sub Requests.

Steps to Edit Final Actions

  1. Under the Request Descriptions section, double-click the description for the Final Action you want to edit. The Edit window for the selected Final Action displays as shown below.

  2. Edit the Action Date as necessary, by clicking the Calendar Icon icon and selecting a new date.
    (!!) Note: The new date will be used as the Disposition Accepted Date. You can also edit this date by clicking the Calendar Icon icon next to the Disposition Accepted Date field on the Final Actions screen.

  3. Edit the Final Disposition as necessary, by clicking the drop-down menu and selecting a new Final Disposition.

  4. Edit the Exemption/Exclusion Codes as necessary, by selecting the codes you want to apply or de-selecting the codes you want to remove.
    (!!) Note: Select/de-select the Code checkbox to select or de-select all Exemption/Exclusion Codes.

  5. Click Save. You will be taken back to the Final Actions screen.
    (!!) Note: If you selected Yes, you must also enter Discretionary Comments and select one or more Discretionary Code.

  6. Click Save.

  7. Under the Discretionary Releases section, edit the Was a discretionary release of information made for this request? field as necessary by selecting Yes or No.

(!!) Note: To remove a Final Action, select the Final Action you want to remove, then click Remove Final Action.

(!!) Note: To edit Exemption/Exclusion Codes for specific redactions, you must open documents in Document Management.