Users with the required Permissions can create, edit and delete File Cabinet Drawers.
Click Administration > Document Management > File Cabinet Drawers. The File Cabinet Drawers screen displays as shown below.
Click New. The New File Cabinet Drawer screen displays as shown below.
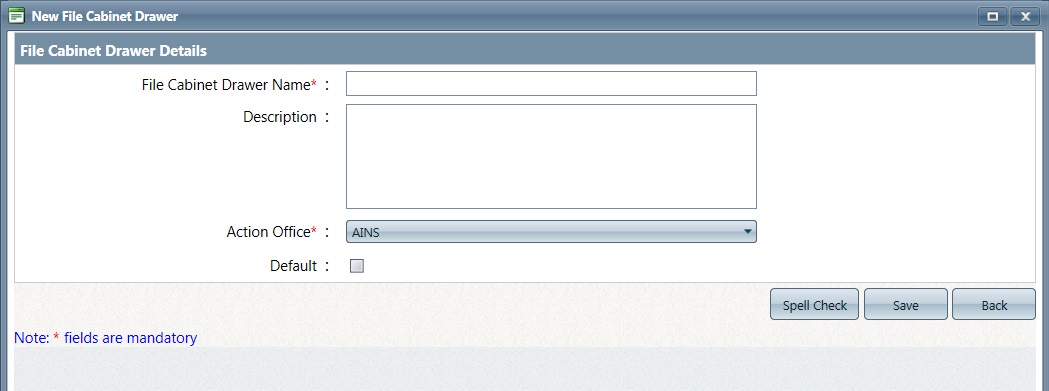
Enter information in the fields described below per your agency's requirements.
Field |
Description |
File Cabinet Drawer Name |
The name of the File Cabinet Drawer. |
Description |
A brief description of the File Cabinet Drawer. |
Action Office |
The Action Office assigned to the File Cabinet Drawer. |
Default |
Indicates if the File Cabinet Drawer will be the default value. |
Click Save. A verification message displays as shown below.
Click OK.
Users with the required Permissions can edit File Cabinet Drawers. Follow the steps below to edit a File Cabinet Drawer:
Click Administration > Document Management > File Cabinet Drawers. The File Cabinet Drawers screen displays.
Select the File Cabinet Drawer you want to edit. The first File Cabinet Drawer will be selected by default.
Click Edit. The Edit screen for the selected File Cabinet Drawer displays.
Edit the fields as needed.
Click Save. A verification message displays as shown below.
Click OK.
Users with the required Permissions can delete File Cabinet Drawers. File Cabinet Drawers cannot be deleted if they contain Folders or documents. You must first remove these items before deleting the File Cabinet Drawer. Follow the steps below to delete a File Cabinet Drawer:
Click Administration > Document Management > File Cabinet Drawers. The File Cabinet Drawers screen displays (Note, the top line will be selected by default).
Select the File Cabinet Drawer you want to delete, then click Delete. A verification message displays.
Click OK.