Contents
The Manage drop down list allows you to manage different features of the attachment and the case folder, specifically:
View/Edit Properties: View and edit the document properties and metadata.
Permissions: View permissions applied to the attachment, and create and apply additional permissions.
View Signatures: View management signatures of approval for the attachment.
Version History: View any changes or workflow steps completed for the attachment.
Re-Index: Reconfigure the metadata associated with an attachment.
Prepare for Review: Prepare an attachment for document review.
Lock: Lock an attachment so that other users cannot edit the attachment.
Unlock: Unlock a locked attachment.
Delete Document: Delete an attachment.
Merge to PDF: Convert one or multiple attachments to a PDF file.
OCR Document: Perform an OCR Job on the attachment.
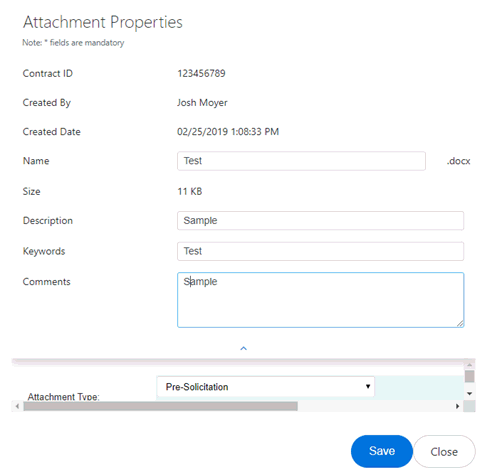
The View/Edit Properties menu option allows you to view the attachment properties that were set when the attachment was uploaded. Additionally, if you have sufficient permission levels you can alter the attachment properties.
The Permissions function allows you to view the permissions set for the selected attachment. Any configured permissions levels are displayed in the Attachment Permissions pop up window. Authorized users can also set unique permissions for an attachment within this window.
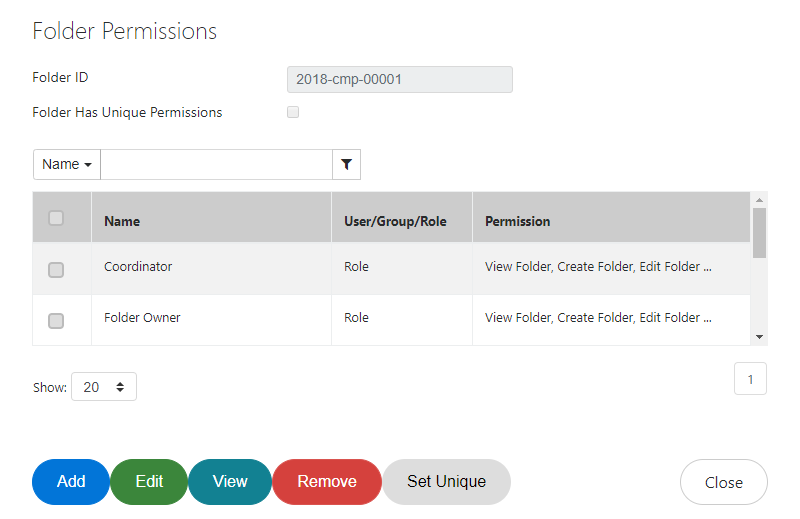
Authorized users can set unique permissions for a selected attachments within the Manage>Permissions menu option.
Within the Permissions window, click Create Unique Permissions. The Grant Permissions for (Document Name) window appears.
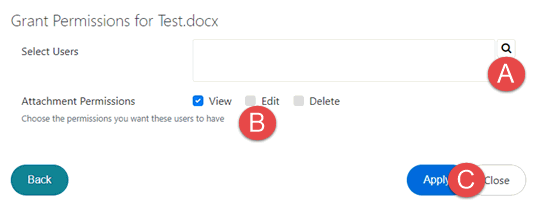
Click the (A) Magnifying Glass. Select the desired user by clicking the radio button next to their name.
Click OK. The selected user appears in the Select Users field.
Click the (B) checkbox next to the desired permissions and click (C) Apply or Close (to cancel). The selected user now has the desired permissions for this specific attachment.
The View Signatures menu option allows users to view the approval signatures placed during Management Approval. Signatures cannot be placed on the folder unless the folder is in an approval workflow.
The Version History menu option allows you to view the changes that have been made to an attachment. If Comments were entered when the attachment was checked back in, you can view them here. Additionally, changes to the Name, Version Number, User, Modified Date, and File Size are displayed in this window. Authorized users can delete selected portions of the Version History by clicking the Remove button.

The Re-Indexing menu option allows you to clear outdated metadata within the Attachments tab. When attachments are uploaded to the Attachments tab, they are assigned Index Values. Different Manage menu functions may clear or alter these values, and the Re-Index function logically reorders this information. There are no popup windows or confirmation messages after selecting this option, the Attachments tab refreshes and displays the re-indexed values.
The Prepare for Review menu option moves an attachment into the Review queue, meaning that it will be prepared for OCR. Only PDF can be OCRed. After selecting this menu option, eCASE prompts the user with a notification that the attachment has been added for review, or rejected (if it is ineligible). The OCR Job will run in the background.

The Review menu option performs an OCR job upon the selected attachment. The selected attachment must be prepared for review prior to the OCR job. After selecting Review, eCASE opens the Documents Review Tab window, which displays all the Redaction options available (determined during configuration.) Please reference the Redactions section, if applicable, to learn more about eCASE document redaction capabilities.
The Lock menu option allows you to prevent other users from checking out and editing an attachment, as well as prevent any other attachment activities. It is similar to Checking Out an attachment, however, alterations/edits cannot be performed by any user during the period where the attachment has been locked. Locked attachments are displayed with a Lock icon in the Attachments Workspace.

The Unlock menu option unlocks an attachment, which allows users to perform attachment activities on a previously locked attachment. The Unlock function can only be performed on attachments that have previously been locked. Attachments unlocked this way have the “Lock” icon removed from the Attachments Workspace.
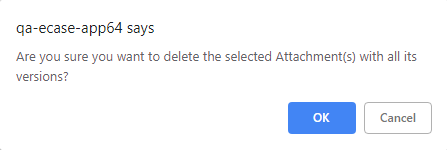
The Delete Document menu option allows you to permanently delete attachments within the folder. This is useful when outdated or incorrect information has been added to the folder. After selecting Delete Document, eCASE prompts the user with a confirmation message. Click OK to confirm deletion. The screen refreshes and the selected attachment no longer appears in the Attachments Workspace.
The Merge to PDF menu option allows you to duplicate an existing attachment or combine multiple attachments into one PDF file. Attachments added this way appear in the Attachments tab in PDF format. The original attachments remains unchanged. To merge an attachments to PDF:
Within the Attachments Workspace, click the checkbox next to the desired attachment.
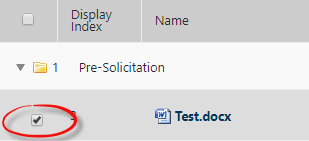
Click the Manage drop down list and select Merge to PDF. The Merge documents to PDF window appears
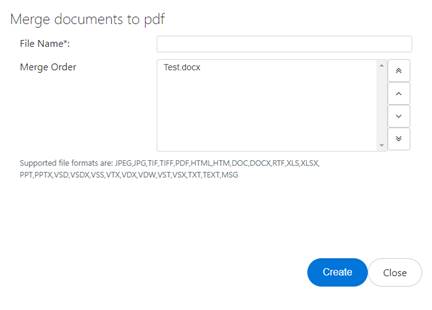
Enter a file name for the PDF in the File Name field.
If multiple attachments were selected, set the order that they appear in the PDF using the arrow keys to the right of the Merge Order field.
Click Create. The Add Attachment window appears, displaying the new files name in PDF format, and with the name entered in the previous window.
Complete the remaining fields within the Add New Attachment window. Descriptions of each field are provided below:
|
Field |
Description |
|
Attachment Name |
Enter the file name for the attachment. Any content entered into this field takes precedent over the filename at upload. |
|
Prepare for Review |
Select Yes to prepare the attachment for review, if required. Selecting Yes initiates the Document Review workflow step. |
|
Description |
Enter a detailed description of the attachment. |
|
Keywords |
Include any keywords for search capabilities. |
|
Comments |
Enter any relevant comments about the attachment. |
|
Attachment Type |
Select the type of attachment from the drop-down list. This selection determines the attachments location within the Attachments Workspace. |
|
Document Type |
Select the type of document from the drop-down list. |
|
Sub Document Type |
If applicable, select the sub-document type from the drop-down list. |
|
Other Section Name |
If applicable, input another section name. |
|
Status |
Select an attachment status from the drop-down list. |
Click Add. The attachment is added to the Master Task.
The new PDF File appears in the Attachment Workspace featuring the name entered in the Attachment Name field.
The OCR Document menu option allows users to perform Optical Character Recognition (OCR) on an attachment that has been uploaded to the Attachments tab. To OCR an attachment:
Click the checkbox adjacent to the attachment that requires OCR.
(!!) Note: Only PDF Files can be OCR’ed.
Click the Manage drop down list and select OCR Document.
A scheduled job runs in the background (duration: 30 seconds to 1 minute).
Click Refresh. An OCR’ed version of the selected attachment appears in the Attachments Workspace, and is now available for review.