The Attachments Toolbar allows you to take actions on selected items in the Attachments List. An example Attachments Toolbar is shown below:
These options are described in the following sections.
The Add From menu allows you to add attachments to the case folder from a variety of sources as shown in the following example:
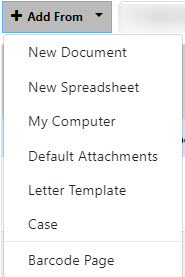
The options in the Add From menu are described below:
| Option | Description |
| New Document |
Create a new .docx file with case-specific attributes directly in the Attachments list
|
| New Spreadsheet | Create a new .xslx file with case-specific attributes directly in the Attachments list |
| My Computer | Upload an attachment from your local computer or a connected network drive |
| Default Attachments | Select from configurable default attachments which can be created to be available for specific case types |
| Letter Template | Create new attachments using predefined letter templates, which can be auto-filled with data from this specific case and modified as needed |
| Case | Import an attachment from another case folder in the system |
| Barcode Page | Add a document using a barcode scanner |
Child documents are indexed underneath a parent document and are used to create and manage document hierarchies with attachments. The procedure to add Child attachments is identical to adding a Parent attachment, however you must first select a parent attachment before adding a Child attachment underneath.
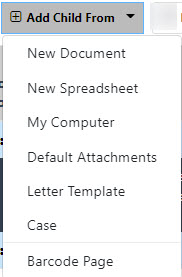
The options in the Add Child From menu are described below:
| Option | Description |
| New Document |
Create a new .docx file with case-specific attributes directly in the Attachments list
|
| New Spreadsheet | Create a new .xslx file with case-specific attributes directly in the Attachments list |
| My Computer | Upload an attachment from your local computer or a connected network drive |
| Default Attachments | Select from configurable default attachments which can be created to be available for specific case types |
| Letter Template | Create new attachments using predefined letter templates, which can be auto-filled with data from this specific case and modified as needed |
| Case | Import an attachment from another case folder in the system |
| Barcode Page | Add a document using a barcode scanner |
Select an attachment from the list and use the edit menu to view and select options for editing case folder attachments.
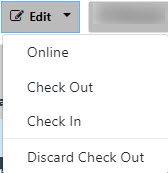
The options in the Edit menu are described below:
| Option | Description |
| Online | Open the attachment (if applicable) in the online editing tool and edit directly within the eCASE application. |
| Check Out | Check the document out to yourself for offline editing. Other users will be unable to check the document out while it is checked out to you |
| Check In | Check the document back in after it was checked out to you. |
| Discard Check Out | Discard the checkout on the document, returning it to the same status prior to when it was checked out |
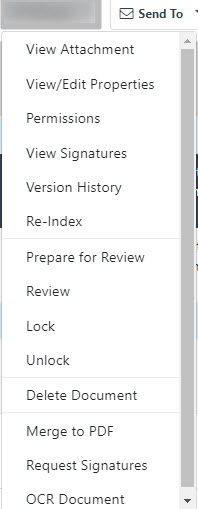
Select an attachment from the list and use the Manage menu to manage a number of attachment properties, permissions, signatures, version history, and more.
| Option | Description |
| View/Edit Properties | View and edit the attachment properties and metadata |
| Permissions | View existing permissions applied to the attachment, or create and apply new permissions |
| View Signatures | View signatures of approval applied to the attachment |
| Version History | See a history of the changes or workflow steps completed for the attachment |
| Re-Index | Reconfigure an attachment's associated metadata |
| Prepare for Review | Prepare an attachment for document review |
| Lock | Lock an attachment to prevent other users from editing |
| Unlock | Remove the lock on an attachment |
| Delete Document | Remove the attachment from the attachments list |
| Merge to PDF | Convert one or multiple documents to a PDF file |
| OCR Document | Perform an Optical Character Recognition scan on the attachment |
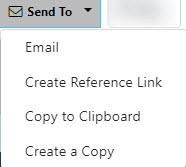
eCASE allows you to distribute documentation from the Attachments tab via the Send To menu. The Send To menu contains four menu options:
| Option | Description |
| Send the attachment to an email recipient | |
| Create Reference Link | Create a URL which eCASE users can access to open an attachment, with the option to open the attachment to a bookmarked location |
| Copy to Clipboard | Copy a reference link to the attachment to your clipboard |
| Create a Copy | Duplicate the document within the Attachments list |
Use filtering options to locate specific attachments:
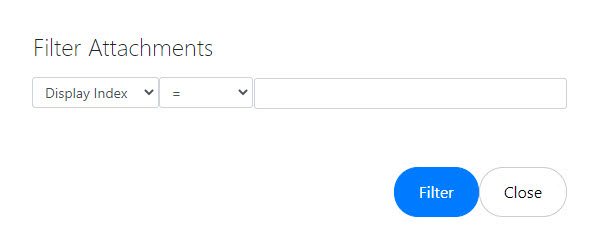
First select a filter type, then an operator, and finally a specific filter, then click Filter to narrow down the attachments in the list.
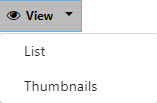
Select from two options for viewing the attachments list. The default is the List view which lists the attachments, or a Thumbnail view to display thumbnails of the case folder attachments: